
Root-Cause Definition: Mold Wear vs. Shipping Warp
When an aftermarket fairing won’t close a clean gap at the fuel tank, the misalignment is usually not random. In most cases it comes from one of two places – mold wear during production or shipping warp picked up in transport and storage. The two behave differently once the panel reaches your bay, so the first job is to work out which one you have.
Mold Wear: A Slow Drift Inside the Tool
Mold wear starts inside the tooling. Each injection or compression cycle exposes the cavity to heat, abrasive resin flow, and clamping pressure, and over thousands of cycles those forces round off edges and enlarge the cavity.
Mounting bosses, locating tabs, and mating flanges drift by fractions of a millimeter per cycle. Individually the change is tiny; over a production run it adds up. The panel was already the wrong shape when it left the line, and no amount of careful bolting will bring fairing alignment back into spec.
Shipping Warp: Stress Introduced After the Box Ships
Shipping warp is a handling and environment problem, not a tooling one. Thin-walled ABS and fiberglass fairings are dimensionally sensitive. Temperature swings inside a container or trailer, humidity absorption that makes the material swell, and the mechanical load of stacked cartons all push stress into the panel.
A fairing that sits under load for weeks bows or cups, and it holds that shape after unboxing. The distortion is stored stress rather than a change in the part’s geometry, so it can relax with time and warmth – which is why it gets mistaken for a stubborn fitment fault.
Why the Distinction Matters
Mold wear is permanent: the geometry is wrong. Shipping warp is stress-driven and often reversible. Test-fit the panel before you force brackets, and the gap pattern will tell you which one you have. For related techniques on tightening body gaps and panel seams, see our guide to restoring proper body panel gaps.
Two Failure Mechanisms at a Glance
The schematic below contrasts the two root causes. On the left, mold wear shows a distorted cavity outline – the tooling itself has changed shape over thousands of cycles, so every part molded afterward carries the same flaw. On the right, shipping warp shows a flat panel bowed by directional stress – the geometry was correct off the tool, but heat, stacking, and uneven load during transit pulled it out of shape.
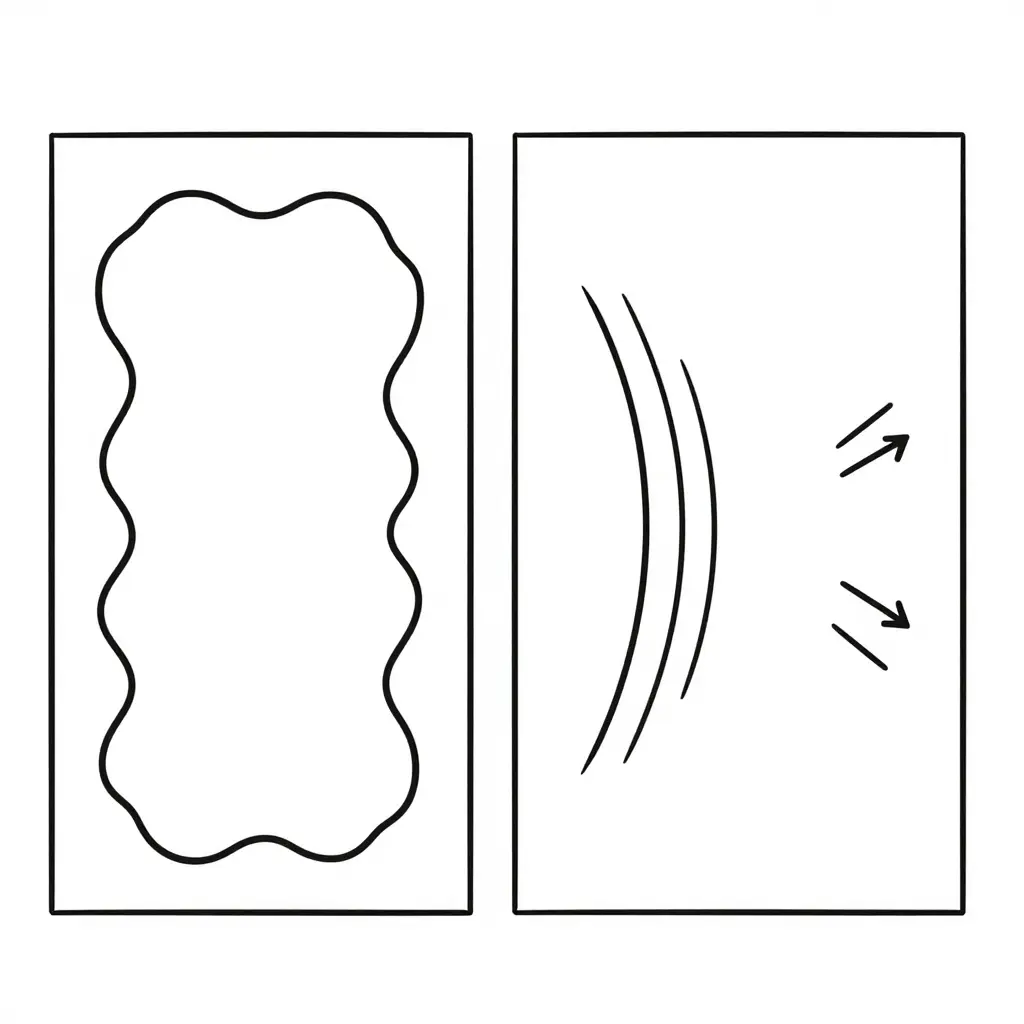
Use it as a quick reference: if the gap pattern repeats across many units, lean toward mold wear. If the gap changes with how the part was stored or shipped, lean toward warp.
Quick Visual Indicators
When a customer brings in a fresh fairing kit that won’t sit flush, you don’t need a full teardown to start narrowing down the cause. An inspection light and a tape measure will get you most of the way. Work through the list below, and pay more attention to the pattern across the evidence than to any single flaw.
- Gap uniformity along the fuel tank seam. Sight along the fuel tank seam from one end to the other and note where the opening widens or pinches. A wandering gap is only meaningful if it repeats on other units from the same batch; a worn cavity copies the same width pattern onto every part it molds.
- Panel edge finish. Examine the exposed edges and the lip where the plastic meets the trim. Crisp, even edges suggest a healthy tool; fuzzy, rounded, or flash-heavy edges hint at mold wear, while bright scuff marks or stress whitening lean toward handling damage.
- Resin surface texture. Compare the gloss and grain across the whole piece. Uniform texture implies good process control; patchy dullness, sink marks, or ghosting usually trace back to inconsistent mold release or worn tooling.
- Symmetry left-to-right. Step back and compare the two sides of the fairing. If one side sits proud and the other dips, suspect shipping warp: an uneven load in transit twists one side, while a worn mold copies the same offset onto every part.
- Repeatability across units. Unpack several kits and compare them. When every unit shows the same offset, blame the mold; when only one or two pieces are off, warp in transit is the likelier cause.
- Fastener hole alignment. Line up the mounting points before you torque anything. Holes that fight the frame on every piece signal mold wear, but holes that align fine yet leave an uneven fairing panel gap afterward point to distortion.
- Consistency after a mock fit. Dry-fit the panels, then check again once the hardware is snug. Gaps that stay even under tension point to sound tooling; gaps that open or close as you tighten suggest the part is still relaxing.
If a seam keeps splitting no matter how carefully you set the panel, proper seam sealer repairs can save you a callback. Photograph the suspect areas and note where the gap lands, and you’ll have a case that’s easy to hand off to the supplier.
Mold Wear vs Shipping Warp: A Scannable Reference for the Bay
Use the table below to consolidate what the checklist turned up. It compares the two root causes across the criteria that matter on the shop floor. For getting panel finishes to look factory-correct, see automotive paint color matching techniques.
| Comparison Criterion | Mold Wear | Shipping Warp |
|---|---|---|
| Location of the gap | Opens at high-wear zones such as mounting tabs and clip slots near the fuel tank cutout | Opens at corners and long unsupported spans, usually on the exposed side of the tank panel |
| Left-right symmetry | Consistent from unit to unit; the same offset appears on every part from the tool | Often asymmetric, since heat and stacking load act unevenly and may twist only one side |
| Gap consistency across batches | Stable within one batch but drifts slowly as the tool ages over months or years | Inconsistent batch to batch and even unit to unit, driven by heat exposure in transit |
| Panel edge finish | Clean painted edges, because the panel is intact and only the gap position drifts | Stressed or slightly distorted edges, with possible paint crazing at the flex point |
| Surface texture | Original mold surface finish is preserved with no new waviness | Often shows subtle oil-canning or wavy reflections from the panel flexing |
| Repeatability across units | Recurs on every unit from the same tool, so a fresh identical fairing gaps the same way | Variable; a panel from another shipment or one laid flat may seat correctly |
| Response to heat | Reheating will not close the gap, because the tool geometry itself is wrong | Gentle warming while clamped can relax the panel and restore much of the original shape |
| Gap direction | Gap runs parallel to the wear track along the mating flange | Gap tapers from wide to tight, widest at the unrestrained corner |
| Best correction path | Replace with a fairing from a newer tool or shim the affected mounts | Re-form the panel by clamping and heat-soaking before any adjustment |
| Fastest tell-tale | Multiple identical units fail identically | The same part fits fine on a different bike or a different shipment |
Read it this way: if the same gap repeats on every unit from a batch, the tool is the problem. If the gap is asymmetric, tapers toward a corner, and varies between shipments, shipping warp is the culprit.
How Mold Wear Develops Over Production Runs
Mold wear is not a single event; it accumulates with every cycle the tool closes. The practical point for a shop is that mold wear produces repeatable, batch-wide patterns rather than random one-off defects. If two bikes from the same production run show the identical misfit in the same place, the tool is a likelier cause than the shipping crate.
The Mechanisms Behind the Drift
Every injection or compression cycle wears the steel a little. Erosion starts at the parting lines and high-flow gates, where molten material scours the cavity surface over thousands of shots. As edges round off, the molded part loses the crisp geometry the original design intended.
Release-agent buildup makes it worse. Silicone and spray residue bake onto the cavity walls, changing the mold’s internal volume and texture. A thin layer looks harmless but shifts the finished wall thickness enough to matter at a tight fit.
Thermal cycling accelerates the drift. Repeated heat-up and cool-down cycles expand and contract the mold block, stressing the alignment pins and widening the clearance between mold halves.
Why the Gap Repeats
Together these forces produce dimensional drift: finished parts move steadily away from nominal. Every unit from that cavity inherits the same worn geometry, so the gap repeats across the whole batch. A tolerance that once held a few tenths of a millimeter slips out of spec, and aftermarket fairing kits molded from that tool carry the flaw on every panel.
That consistency is useful: it separates true mold wear from the irregular distortion typical of shipping warp. When the gap matches on multiple units, treat it as a tooling issue.
Mold Wear vs Shipping Warp: Reading the Fuel Tank Gap
When an aftermarket fairing leaves a gap at the fuel tank, the first question is why. Mold wear at the factory and shipping warp after the part leaves the line account for most of these complaints. On the bike they look similar; once you measure, they diverge.
What mold wear looks like
Injection molds don’t last forever. Each cycle wears the tool a little, and as a mold ages the cavity can drift out of tolerance. The telltale sign is consistency: one tool stamps the same offset onto every part it makes. Measure a handful of fairings from one worn mold and the same gap shows up each time.
That repetition is the diagnosis. If five fairings from the same supplier all miss by the same 3 mm at the tank seam, the tooling is the problem, not shipping abuse.
Seeing the pattern in the numbers
The chart below plots average fuel tank gap measurements across six batches, mold-wear units in blue and shipping-warp units in orange. The blue bars sit close to a 3 mm baseline and repeat from batch to batch; the orange bars scatter from under 2 mm to nearly 6 mm.
That contrast – tight clustering against wide scatter – is what you show a supplier when you want a return approved.
Why shipping warp behaves the opposite way
Heat, stacking pressure, and time in transit cause warp, and they don’t act evenly, so it strikes inconsistently. One fairing in a shipment can be perfect while the next is twisted. That randomness makes warp harder to predict and lets two identical-looking gaps have different causes. When gaps swing between units, suspect warp and check the packaging, pallet stacking, and storage temperature history.
A quick field test
You don’t need a lab. Four checks separate the two:
- Measure several units. If the gap repeats, lean toward mold wear; if it varies, lean toward warp.
- Check symmetry. Warp usually produces an asymmetric twist that only shows on one side of the tank.
- Look for heat traces. Warp often pairs with rippling or a wavy edge near the seam.
- Compare batches. A single bad batch points to a worn mold; scattered failures point to transit.
If the investigation leads into panel work, our guide on mastering seam sealer repairs covers the finishing steps that make corrected gaps look factory-fresh.
Telling mold wear from shipping warp is mostly a matter of measuring and looking for repetition. The pattern does the rest.
How Shipping Warp Develops: Why the Gap Doesn’t Match the Mold
If a brand-new fairing shows a crooked gap at the fuel tank before you’ve touched a bolt, the cause is often shipping warp, not a worn mold or your fairing fitment technique. Shipping warp is a one-off, asymmetrical distortion inside a single panel. Mold wear repeats the same flaw on every part from the tooling run.
A flat, factory-true panel arrives twisted through four stages:
- Heat exposure in transit. Fairings ride in sealed trailers that routinely hit 140-160°F. Softened thermoplastic slowly takes the shape of whatever it leans against.
- Stacking pressure. Boxes buried under heavier freight creep under constant load, bowing one edge while the rest stays straight.
- Humidity absorption. Composite and nylon panels absorb airborne moisture, swell, then shrink at different rates as they dry.
- Prolonged storage in non-climate-controlled conditions. Warehouses that swing between hot afternoons and cold nights gradually lock in a permanent set.
Because these stresses never act evenly, the gap they create is asymmetric and non-repeating: it won’t mirror the opposite side, and no two warped panels look alike.
Shipping warp is also not static. A panel can keep relaxing after installation, so a gap that looked acceptable on delivery may widen or shift weeks later as engine and sun heat cycles work the material. Knowing that saves hours chasing an alignment the part will never hold. It is a different job from chasing panel gaps you can correct at the bench, where a fix stays fixed.
Root-Cause Frequency: Where Fuel Tank Fairing Gaps Really Come From
It helps to know how often each cause shows up in real bays. The chart below, based on field reports from repair shops, breaks down what causes aftermarket fairing gaps at the fuel tank. Treat it as a rough probability map: the percentages reflect how often techs trace a gap back to each cause, so you can weight your inspection accordingly.
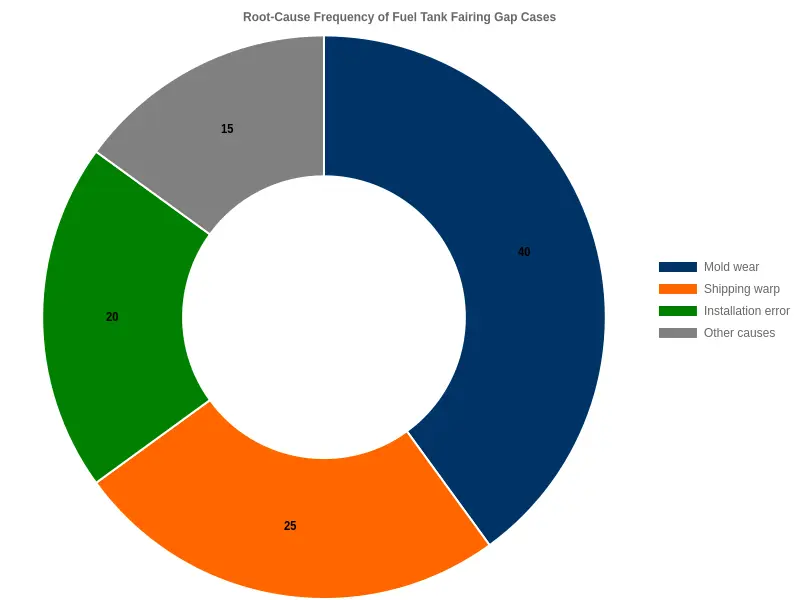
Mold wear is the most common single culprit, so checking surface texture and symmetry early saves guesswork. Shipping warp follows close behind; don’t overlook how the part was stored and shipped. Installation error is also frequent and often self-inflicted, so slow down on bracket alignment and fastener torque. The “other” slice covers impact damage and mixed causes; ruling those out takes a methodical look rather than a snap judgment.
FAQ: Aftermarket Fairing Gaps at the Fuel Tank
The questions shops ask most often when a customer brings in a kit that won’t sit flush.
Can you tell mold wear from shipping warp without heat testing?
Yes, usually. Mold wear is repeatable: the same misfit in the same location across multiple units from one batch. Pull three or four fairings from the same order and test-fit them; if the gap lands in the same spot every time, the tooling is at fault. Shipping warp varies from unit to unit and tends to cluster at the largest unsupported panels or the mounting bosses that took the most stress in transit. A straightedge, a tape measure, and a factory panel drawing separate the two in about ten minutes for most kits.
Does shipping warp ever reverse on its own?
Sometimes. Thermoplastic fairings such as ABS and polypropylene can relax toward their molded shape once they are warmed and left unloaded. A panel stored in a hot shop, or warmed to 60-70°C (140-158°F) and then supported correctly, may recover 1 to 3 mm. Thermoset panels like fiberglass and SMC rarely spring back because their cure is permanent, so distortion there tends to stay put.
Are OEM fairings immune to these gaps?
No, but they are far less prone. OEM tooling is inspected and maintained on a schedule, so mold-wear gaps are uncommon. OEM panels still warp if they are stacked badly or shipped in a hot trailer. OEM status is not a guarantee of perfect fitment, only a lower probability of trouble.
How much gap is acceptable at the fuel tank?
Most manufacturers allow a uniform gap of roughly 2 to 4 mm (0.08 to 0.16 in) between the fairing edge and the tank. Consistency matters more than the raw number: a steady 3 mm gap running evenly reads as normal production tolerance, while a gap that jumps from 1 mm to 8 mm across a 20 cm stretch is a defect, not a tolerance. Check several points along the edge rather than trusting a single measurement.
Can a warped fairing be corrected or must it be replaced?
Mild shipping warp can often be corrected with controlled heat, proper support, and gentle weight, or by adding thin mounting shims. Mold wear cannot: if the panel was molded wrong, the error lives in the tool, not the part, so no amount of persuasion will fix it and the kit should go back to the supplier. For shops handling a lot of panel work, dependable body panel and seam repair methods pay off, because resealing and refitting often follow a fairing correction.
Which cause is more common in aftermarket fairing kits?
Across all kits sold, shipping warp is the more common cause, especially for kits that travel long distances or sit in poor storage. Mold wear dominates specific batches and cheap tooling, and it is the more common cause among the gap cases shops actually diagnose. The rule is the same either way: repeated gaps across several kits from one supplier point to mold wear; scattered, one-off gaps point to shipping warp or handling.
How should a shop document these findings?
Photograph each test-fit, note the gap at three or four points around the fuel tank, and record the batch or serial numbers on the panels. That evidence makes warranty claims, supplier conversations, and customer explanations easier to settle.
Conclusion: Turning Gap Patterns into Actionable Decisions
The pattern is the answer. When aftermarket fairing gaps open up at the fuel tank in the same spot across several units from one shipment, they point to mold wear – a manufacturing fault in the tooling. When those gaps wander – wide here, tight there, gone on the next unit – they point to shipping warp from heat, pressure, or poor packing during transit. Telling them apart keeps a shop from blaming the wrong party and wasting time on fixes that never hold.
For documentation, photograph every dry-fit with a ruler or feeler gauge in frame, log batch and lot numbers, and note whether the gap repeats or scatters. When you contact a supplier, send those photos with a clear description of the pattern and ask directly about mold maintenance schedules and packaging standards; a pattern-driven complaint gets real traction. Before paint, always dry-fit panels, compare at least two units from the same batch, and measure gap width at fixed reference points. When gaps need filling, trusted techniques for repairing stubborn body-panel seams help.
Finally, sourcing from a specialized motorcycle fairing exporter with a large style catalog is one way to lower the odds of both defects, on the reasoning that mature tooling and established packing routines catch wear and warp before they reach your bay.
Repair Resources and Sourcing Notes
Telling mold wear from shipping warp usually means comparing your measurements against solid bodywork references. If gaps appear only after reassembly, walk through a detailed DIY car repair guide to confirm every bracket, grommet, and fastener is seated correctly; misaligned aftermarket fairings can imitate true distortion. For panels that flex or crack near mounting tabs, proven seam sealer repair methods restore structure with flexible sealant instead of simply concealing the flaw.
Surface finishing matters too. Correcting the fit is only half the job: a reliable paint color matching guide keeps your refinish work blended and consistent, and practical DIY scratch removal methods handle the minor scuffs that travel inevitably adds to any motorcycle fairing.
Finally, a sourcing note. Supplier catalogs sometimes span 3,000+ styles, and some suppliers claim pricing 10-40% below equivalent OEM panels and a six-hour commitment to answering fitment questions. Those are vendor figures, not verified benchmarks – check them against your own quality-control process. Pair careful inspection with reputable references, and installation gaps become easier to diagnose.